Thursday, May 10, 2012

Cranberry, Lemon Whey Powder Muffins - grain free, sugar free

I am so excited about this recipe! 
Sometimes I come across good recipes and I put them aside because either I have them in mind for sometime special, I need a specific ingredient, or I am unsure of the outcome. I was even more excited to try this recipe because I got to use my NEW food processor!!!!!!


I found a very similar recipe not too long ago. I book marked it, and put it aside for that special day. 
My beloved husband the other day was excited to say we had enough air miles finally to buy something. He saw this fantastic Compost that he really really wanted (lol I know). It may seem silly but it's about 129$ to buy it in store and 99$ on sale. I think it's a little absurd how much they cost when they are totally plastic and just sit there. 
So he ordered it ( so exciting!) and then I of course was bugging him about what I was going to receive from MY hard earned air miles... (hint, hint). There was nothing that I really NEEDED except:
1. Icecream machine
2. Food Processor
I of course have a fantastic food processor. It's not even that old I got it at my bridal shower. It has become my favorite tool (besides my beloved fancy Kitchenaid mixer), especially after gluten free. I find almost every recipe if not in my mixer is in my processor being pureed and emulsified.
3 Days after we placed the order for the processor it was going to take 4-6 weeks for it to arrive. Today, sitting there with my coffee in peace and quiet. Door bell rings.
MY FOOD PROCESSOR WAS DELIVERED TODAY OMG!!!
It's so shiny and perfect! Look it even has a special box for all of the attachments. I was even more excited because when I opened the box I realized it was the fancy pancy one on TV. The one I always dreamed of having but never would due to it being 289$ (and I was complaining about the compost lol).
I honestly never even thought about it but I didn't even look at the processor on the website when Kyle was telling me about it. I just heard the specifics and was sold. I didn't care, honestly mine is like 30$ originally and I have to puree most things in two batches. It's like a 6 cup this one is a 13 cup. It also comes with two different bowl sizes and the small bowl that you use for beating egg whites is the size of my old processor lol.
It's a sad day when an appliance moves on. It has got me through every fad diet and recipe I have ever tried. RIP. Mom, I am giving it to you!!! I heard you need one.

There is is the shiny new one beside my old retired one.. sad:(

Not too long ago (12 days ago) I was sitting on a beach in Mexico soaking up too much vitamin D and eating too much bad food (gluten free of course). Since then I haven't been feeling quite the same as I did before. We have decided to go and follow cycle 1 of the 17DD and see if it makes a difference. 
The problem that I always have following cycle 1 is lunch time and snacks. Lunch time is hard when there is no crackers, bread, tortilla, granola, cereal, biscuits, etc. 
And I get tired of yogurt pretty fast when it comes to snacks.. lol. 
So, I was determined on my day off today to sit at the computer until I came up with great ideas for baked items that taste delicious and are completely compliant.
Though, I spend most of my life eating grain free, when it comes to baking I use nut flours, coconut flour and some starches for the base.
Without these what is left? I cant use beans, pumpkin puree, zuchinni puree, beets, potatos or any sort of base that I am familiar with. 
If I told you to come up with a recipe to make muffins without flour or meal of ANY kind would be able to do it? 

Ugh so frustrated and hungry I sat there. I searched on Google and through all of my great books.
I will be listing 17 recipes over the next 20 days as I prepare and start my cycle 1. It's important I am able to show you that you can be compliant, eat well and not get depressed like I have so many times. 

Are you familiar with whey protein -------------------->
It's a great alternative when it comes to baking without using flours or starches. It can be tricky though, it reacts completely different than flours and you can receive a very unpredicted result.
We happen to have a huge container of it left over from when Kyle would take a protein shake every morning. I am glad we didn't throw it out as it's crazy expensive and lasts years.
I was also excited to discover the one we had is gluten free, sugar free, with no preservatives, dyes, flavors or anything unnatural.
So my first experiment today was to try making muffins. 
I looooove muffins. I have many muffin recipes but not one that uses whey or only whey for the main ingredient. I took a combination of a recipe that I found and a recipe that I have used traditionally with almond flour.
They are deffinetly different, but actually GOOD different. They taste like angel food cake and have a texture very similar to it. 
I ate one hot out of the oven with butter and I was actually very surprised. Let me know what you think.

#1 Cranberry Lemon Muffins - Whey powder
gluten free, grain free, low lactose, sugar free

*You will need to use muffin liners or silicon liners for this recipe

In a food processor or mixer bowl combine:
1 C psylium husk, flax meal, or almond flour (almond flour not on 17DD)
1 C xylitol, stevia, or sucralose** (if whey powder is sweetened hold back on sweetener)
1 t organic corn free baking powder
1/2 t aluminum free baking soda
1 1/2 t ground cinnamon
1/8 t ground nutmeg
1 t sea salt

In a glass measuring cup mix until blended:
1/2 C plain organic greek yogurt, sour cream, cottage cheese, yogurt cheese
1/2 C water
1/4 C melted organic butter, coconut oil
1 t real vanilla extract
2 organic eggs
1 T organic lemon juice or more if desired

Pulse dry ingredients until mixed. Slowly while mixer is running pour in wet ingredients. Scrape down sides well. While mixer is running slowly parts at a time add in whey powder.

1 C unsweetened plain or vanilla whey powder
Add 1/2 C whole fresh or re hydrated cranberries

Pulse until well blended. Whey powder will cause the batter to thicken, clump together and be very shiny. Make sure there is no lumps.

In a cupcake pan lined with 12 parchment paper liners pour in muffin batter until 2/3 full. They will rise quite a lot, but will shrink back down upon cooling. Adding too much batter will cause the muffins to stick together, so if needed use 2 pans for baking.

Bake at 350 for 18-20 minutes.

The muffins will fall quite considerably once removed from the oven (similar to a souffle) as there is no starch or flour in the mix to hold them up. They may look funny, but they taste pretty darn good.

Friday, May 4, 2012

Pie Crust - Gluten free, Grain Free, Sugar Free, Dairy Free (Apple Pie, Straw Berry Rhubarb Pie)

So this morning I was going through my produce baskets to see what I needed to order this week in my fresh weekly produce basket. 
I had soo many apples sheesh, and low and behold they were all getting soft at the same time. So, of course what can you make with apples? 
There was my brothers voice in the background "Apple Pie" and then my fate was already planned for me. 
Of course I had to make apple pie. It's not my favorite really, but I love it if you have GOOD quality sugar free ice cream not the No Name brand by the bucket hard as a rock crap ice cream. bleh.. If your going to have that you might as well have the processed store bought pie that has that filling that sits for months in a bucket.
Gosh that makes me cringe. Knowing what I know now, I do not want to eat it. I can think of the list of ingredients and picture them in my head.
SOOO, a real apple pie. yum. 

So I got out my cook books to look up different pastry shell recipes to see which one I felt like making.
I could have used the recipe I served at Christmas with my butter tarts and pumpkin pie. However, when it comes to double crust pies I don't like the texture of a rock hard crumbly crust. I want it to be soft, tender, firm, flaky, and delicate :)
Apple pie is so much more special then pumpkin pie. It needs the delicate crust folded over the top of the apples, versus just underneath the pumpkin.
There it is my beutiful pies.
Just the other day I was at my favorite Organic store and there it was a bin of organic rhubarb sitting there waiting for me to pick it. MMM so I bought a bag thinking if I didn't use it I could freeze it until I had time to make it into a pie.
Strawberry rhubarb pie.. My dad's mouth is watering right now lol. I thought that I would actually never make it myself as it's not my favorite. However my husband is a HUGE fan. He loves rhubarb stew, crisp, soup, pie and cobbler. 
So I thought about him and I figured while I was making the pastry I would just make a double batch!

So here it is. My delicate pie crust which I used a combination of two recipes from my favorite cook books to make this one. It's definitely soft, delicate and crumbly. I will warn you it is not nearly the same texture as a traditional wheat pastry. It doesn't "flake" because there is not gluten in it to surround the butter and flake during the baking process. It also has completely different ingredients but I thought it was fantastic!
I have about three more different recipes to try to pick out my favorite one but this by far was easy (no food processor, blender, or mixer) and it didn't have to chill hardly at all. 
I added cute little harts on the top to make them pretty as I had a smidgen of pastry left over (as usual).

Pie Pastry Crust DOUBLE CRUST - gluten free, grain free, dairy free, sugar free

Please note I have been receiving great comments in my email about this recipe. It is supposed to be more "cakey" than flakey. It is nothing like a traditional wheat crust. Also you will need to adjust the fruit fillings to your taste and following climate will change cooking time and starch requirements.

Mix dry ingredients in a large mixing bowl:
2 C blanched almond flour
1/4 C organic coconut flour
1/2 t aluminum free baking soda
1/2 t sea salt
 *add up to 1/2 C coconut flour depending on climate

Mix in a glass bowl:
3 organic eggs
1 T sucralose, xylitol, honey, raw agave nectar or 1/8 t stevia
1/4 C organic melted butter, coconut oil or non hydrogenated grape seed oil

Mix the dry ingredients with a pastry blender to remove all clumps and blend. Pour in wet ingredients and mix together with a spatula. Mix until dough becomes sticky and sticks together firmly in a large clump.
Let stand 3 min. If your dough looks too wet after 3 min add more coconut flour. Your dough should be moist but sticky and clumpy not wet.

Roll out dough between 2 pieces of parchment paper 1/4 inch thick (thinner will be harder to remove). Grease your glass pie dish with coconut oil or butter thoroughly.
Remove one sheet of parchment and transfer the dough to your pie dish.
If it breaks it's really easy to press another piece together and fill in the holes, no worries.

Place your bottom pie in the fridge. Place the second half of dough in a ball in the fridge while you make your filling.

Please read on about using this recipe with traditional recipes and alternative fillings.


This pie crust can be made using any traditional recipe. The only down fall is baking the crust over 18 minutes will burn it VERY QUICKLY.
You will need to pre cook ALL of your pie filling using this recipe with a double crust.

If you are using a single crust in say pumpkin pie, simply cover the pie with tinfoil and bake. Your edges will still end up very dark.

Apple Pie Filling - Sugar Free


In a saute pan over medium:
5-6 Galla apples peeled, and sliced 1/4 inch
2 T butter or coconut oil
1/2 C water

Cook the apple for 5 minutes until slightly tender. Add remaining ingredients:

1/2 C sucralose, xylitol, palm sugar, or 4 pkg stevia
1 t cinnamon
dash of nutmeg
dash of sea salt
1 t konjac flour or 1 T tapioca flour mixed with water until blended

Stir in the spices and tapioca until mixture thickens and forms a sauce. Remove from heat. 
Immediately pour apple pie filling into your chilled pie shell. Roll out the top crust using the same technique. Seal edges with a wet fork. Place 4 slits into the top of the pie crust and brush with egg wash.
Bake @ 400 for 18 minutes. Watch it, mine got very dark past 19 minutes.


Of course I had to experiment a tad with the strawberry rhubarb pie. I have never cooked this filling before and I was unsure if it would taste the same or if it would be done after only cooking for 18 minutes.
It turned out very well, it tastes the same to me as it did in my past memories. The only note I have is using tapioca starch in place of traditional flour made the sauce for the pie more white than usual. It however had no effect on the taste or texture.
If this bothers you I recommend using rice flour, or oat flour instead. Or simply a couple drops of beet juice and it will look just like the old days!

Strawberry Rhubarb Pie Fulling - Sugar Free

In a saute pan over medium heat:
2 T butter, or coconut oil
2 C of chopped organic rhubarb
Cook stirring ocassionally. Cook for about 5-7 minutes until it's just slightly tender. You only want it to be about half way cooked through as it will cook in the oven.  

Stir in:
1 1/2 C sucralose, xylitol, palm sugar, 1/2 C stevia
1 t konjac flour or 3T tapioca flour mixed with water until blended

Pour corn starch into rhubarb and sucralose mixture until combined. Remove from heat and place filling in a cold bowl. (If you leave the filling in the pan while adding the egg it may curdle).

Add 1 C Chopped strawberries
Scramble 1 egg with 1 t lemon juice very well. 

Pour over the filling and stir well to combine. Place in chilled pie shell imediately. Roll out the top crust using the same technique. Seal edges with a wet fork. Place 4 slits into the top of the pie crust and brush with egg wash.
Bake @ 400 for 18 minutes. Watch it, mine got very dark past 19 minutes.

It was fabulous! My glutenous brother said he wanted a second piece after 3 bites! MMMM... I am hoping to try this recipe using peaces and raspberries.

Tuesday, April 17, 2012

White Sauce "Roux" - Grain Free, Gluten Free, Starch Free, Dairy free

I have finally done it. A delicious, smooth roux sauce without starch or flour. 
I have been failing miserably at doing this for so long that every time I end up using rice flour and waist a crap load of butter in the process.
Of course you can make a traditional white sauce base using rice flour or any other alternative grain. So if we can't use flour then use a Starch right? However, we are grain free of course and that also then limits starches
 
Tapioca Flour
Arrowroot Powder
Konjac Flour
Potato Starch
Organic Corn Starch

There is really no health benefits whatsoever from using starches. They all are high on the glycemic index, difficult to digest and add carbohydrates and calories that are not as good for you as grain free choices.

You can also use vegetable gums to thicken such as:

Xanthum Gum or Guar Gum

However, those really suck when it comes to thickening sauces. They get a very unappealing texture and gel really gross.

If you Google roux sauce alternative thickeners it will come up with most of these. As well as:

Flax Meal
Chia Meal
vegetable purees (such as potatoes)
heavy whipping cream
coconut milk
yogurt

Those all work in a way. Flax meal is nasty and grainy and chewy though and completely looks like a brown mess. 
Chia meal gives it a gelatinous clumping effect but not smooth unless it is whipped really well for a very long time.
Vegetable purees are good for soups and chowders but not every recipe.
Heavy cream works but not so much on a white sauce unless it is reduced by half which works but can take hours, and uses much more expensive organic whipping cream then I desired. 
Coconut milk has the same effect.
Greek yogurt does work. Kind of like sour cream but it definitely changes the taste after you add enough of it to thicken your sauce. 

Coconut flour does work well on a batter or a smoothie but it cannot be used in the same matter as a direct replacement of white flour as it will turn brown instantly and burn as soon as it touches the hot butter. 

Alas... this has been my long struggle. 
I was looking at the fridge today looking at what I could make for dinner that will use up anything extra as I like the fridge empty before going on vacation. I had half a loaf of bread in there and it needs to be eaten pronto.
I also had two big cans of salmon left over from a case lot sale. They were calling to me along with my bag of organic onions and some slowly wilting parsley.
SO, I sighed.. and thought well it's obvious I need to give my white sauce another shot. 
I started early today in order to avoid making dinner three times in a hurry because every batch failed.

It's very frustrating after you have failed 3 times. You just give in and  out your big bin of rice flour comes and you start scooping as you get ridiculously hungry. That's exactly what usually happens.
In one of my newer cook books there is a recipe for an almond frosting that is used for brownies and quick breads. It was delicious and was my first nut based frosting I had ever made. I was so hesitant as I very much dislike the taste of almonds where they should not be. Much too my surprise every one ate them and never asked what was different about the icing. I never really gave it much thought besides a smiley face beside the recipe and hoping that I could play with the recipe in the future. 

Why even bother with a nut frosting? Unless you have a dairy allergy you probably have not even thought of a nut frosting. The difference is, it's crazy hard to make frosting without using confectioners sugar. 
Confectioners sugar is 50% mixture of ground up powdered white cane sugar and GMO corn starch. So it's not just the issue of the corn starch it's the sugar content as well.
I usually make my own powder sugar substitute using sucralose, arrowroot starch, and instant milk powder. However in any recipe where the icing needs more then 1.5 C of powder sugar the alcohol chemical taste of the sucralose is really unpleasant.
If you switch over to say natural stevia instead of sucralose, You end up with a really runny icing as there is not enough base for the sweetness of the stevia. 
If you use the powdered stevia powder that you can buy in the store it is mixed with another alternative sweetener such as exthrinol and a WHEAT preservative thickener maltodextrin.
Sooooo looking for alternative icings is always on my mind. The nut frosting becomes thick without added starch and is actually quite smooth and tastes nothing like nuts.

I was reading on one of my favorite blogs that using nut butters are a good use for a thickener. Well that's great except I do not really like peanut butter in everything and almond butter I only use in specific baking as it is really expensive and has a very specific taste. 
Then I remembered that frosting I made. You basically make a nut butter and it causes the icing to thicken. However you also use agave nectar and I wasn't sure how it would be if you did not use agave or a liquid sweetener.

I wanted a savory roux not a sweet roux so I did not want to use any sweeteners. 
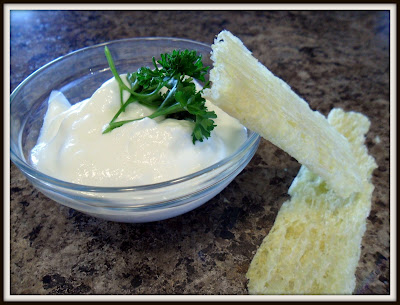
It was a creamy greek yogurt thickness. I am also excited to say it was a neutral sauce that can be substituted into any recipe without altering the taste.
If you don't have a food processor I recommend a blender. You have to have the mix running as you add the ingredients in order to get the right consistency. You could probably use a powerful mix master on high instead but I am unsure of the exact results you can expect.
I had to add the crackers as a touch for the photograph. You can turn this roux sauce into a savory soup base, stew base, sauce base or into a creamy topping or gravy. It should take on whatever flavors you add to the pot. The best part about the sauce is you are able to change the ingredient to suit your diet I will list the first ingredients as the ones that I used and the substitutions directly beside them.

I made my roux sauce into a salmon sauce recipe my mom shared with me years ago. We will enjoy it over toasted and buttered grain free bread.

I added 1 lrg onion to a pan of melted butter and sauteed for 5 min until browning. I stirred in my roux sauce parts at a time until heated through, I threw in 1 bay leaf, 2 handfuls of chopped fresh parsley, Herbamere, ground pepper and paprika. 
Bring to a simmer and add two lrg cans of organic salmon liquid and all.
I then transferred to a crock pot and set it on high for 4 hours while I continued working. I can tell it's going to taste delicious!

White Sauce "Roux" - Grain Free, Gluten Free, Starch Free, Dairy Free

In a food processor add:
1.5 C of blanched almond flour**
               or 1.5 C raw cashews, raw macadamia nuts, or raw whole almonds without peel
1/3 C coconut oil liquified
        or melted organic butter, lard

Process on high until gelatinous and sticking together. It should be thick . If needed add more coconut oil to thoroughly saturate the almonds.

Scrape down sides. Turn on food processor and slowly pour in:
1 C of coconut milk
or organic 1% milk, half and half, almond milk, cashew milk, soy milk, rice milk etc.

Beat on high until completely smooth. (It should have the consistency of thick heavy whipping cream)

Add while processor is spinning:
2 t of organic coconut flour (You may need to add more depending on climate)

Blend until smooth Transfer sauce to a glass bowl and refrigerate for 15-20 min. It should come out of the fridge twice as thick as it went in and should be about the consistency of a traditional roux sauce. If it is not as thick as expected you may need to add more coconut flour, whip in food processor again and add more coconut flour until desired consistency is right.

**Blanched almond flour must be used. If not available please use cashews or macadamia nuts as the brown peels on the almonds will stop the consistency from forming properly. 
If you are having troubles getting the nuts to puree soak them for 30 min in filtered water prior to blending to soften.**

To use in a recipe:

Melt 1 T of butter or coconut oil in a sauce pan until just bubbly. Pour in sauce parts at a time stirring constantly until starting to bubble. Continue following recipe instructions.

To use as a roux sauce:

Melt 1 T of butter or coconut oil in a sauce pan until just bubbly. Pour in sauce parts at a time stirring constantly until starting to bubble. Drop in one bay leaf, 1/2 t dry mustard, dash of smoked paprika, herbamere and pepper to taste. Heat over low heat for 15 min stirring constantly so not to burn.

To use as a topping for cakes, donuts, brownies, or desserts:

While pureeing in food processor add 1/4 -1/3C raw agave nectar and a splash of vanilla or mint extract. Refrigerate until needed.

Saturday, April 14, 2012

Tiramisu - Gluten Free, Grain Free, Sugar Free

I am having a dinner party tomorrow. Or I should say we are. One of my friends is coming over with her husband. We go out for lunch every couple weeks and this time I thought it would be nice to invite them over.
Now of course they are glutenous but I tell her constantly about my battle with recipe making, finding supplies and my sucess. So it is no mystery that we are grain free compared to them. However dinner is actually one of the easiest meals to host with friends that eat wheat without having them notice the difference.
I planned out our menu today and this is what I cam up with.


Honey baked chicken (agave, garlic and lemon sauce)
Steamed peas with parsley
Potato salad with bacon

Tiramisu for dessert

Rochelle will be bringing a side dish as well to add to the menu. It should be delicious I can hardly wait.
So this morning I started working on the potato salad as it alwasy tastes loads better the next day. Today I will be focusing on my dessert but I am going to share my potato salad aswell just because it was to die for yummy.
I usually only make potato salad in the summer because then you can get the good tasty potatos that either you grew or someone gave to you. However with SPUD potatos are always organic and local so I thought I would buy a bag.
We only eat potatos on ocassion. I used 4 large potatos or 1lb. I didnt peel them as the peel was tender and thin and so good for you it's a total waste of time and vitamins. I also can't hesitate the importance of using non hydrogenated mayonaise. Use real mayonaise but with olive oil or organic expeller pressed canola oil.

I use Hellmans Olive Oil Mayonaise. It has no hydrogenated oils or chemicals in it. I have found it available at every grocery store so you should be able to find it without any problems.
For the bacon I use organic thick cut bacon. DID YOU KNOW, I have not found a bacon (until I shopped organic) that didnt have GLUTEN in it? Have you ever thought to read the ingredients on a bacon package? That's actually something I never thought of doing until one of my books mentioned smoked meats such as bacon and ham being hard to find without bad things in them.
You need to avoid things like "Maltodextrin" "Sodiumglutomate" "Smoke flavor" "Maple flavor" "fructose" "Glucose""Cane juice".
None of those are actually natural or good for you. If you made the bacon at home you would NOT use any of those things. YOu probably wouldnt even know where to buy them or what they are used for.
Most bacon is given a sodium nitrate injection or bath, then processed into a package with "smoke and maple flavor". If bacon has been smoked it does not need smoke flavor.
PS smoke flavor and "liquid smoke" (which is compltely natural) are NOT th same thing. Any "flavors" are completely synthetic. They are produced by a chemical called an esther which tells your brain it tastes like smoke. It has nothing to do with smoke whatsoever.
SO, when I noticed SPUD had bacon I bought a pack and divided it right away and froze it. YES it is alot more expensive by double. But it doesnt have crap in it, and it lasts months as I only use about 4 pieces for breakfast between us on a weekend sometime.
I will say, it tastes just as DELICIOUS as the fake bacon but it doesnt shrink whatsoever. It is the exact same size coming out as going in.
Here is how I made the salad:


Potato Salad - Gluten Free, Non Hydrognated

1lb organic yellow boiled potatos washed and diced
1 T diced fresh dill or parsley
3 stems of leafy celery hearts minced
4 organic thick bacon slices fried crisp
1 T white vinegar
1 T bacon grease
sea salt and pepper to taste
dash of paprika


5 hard boiled eggs sliced
1 C olive oil mayonaise
1 T deli mustard
1 T pickle juice
1 T organic 1% milk


Cool potatos in cold water till room temperature. Add first set of ingredients and toss in a bowl. Let stand for 1-2 hours.
Fold in boiled eggs and dressing. Refrigerate overnight.

So I got a new cook book when I went down on my road trip to the USA. For me a new recipe book is like CHIRSTMAS. I know how many recipe books do you actually need? The thing is, when it comes to Grain Free cooking there is so many different methods and techniques beyond almond flour that I feel it's important to learn them all. Also I will try about half of the recipes in each book and maybe only like about 3 of them ALOT. lol.
I am pretty picky as I want it to taste good and not dissapointing and dry and deliberatley missing something.
Last weekend we ate cake. I decided this weekend I have made enough cake the last few months to still linger in my brain. So I flipped to a page in my recipe book and came across Tiramisu.
I have had it in the past but never actually liked it. I recognized though that I never really liked any of the things that they made for me so I thought hey I am certain I am able to make it better.
Of course there is the struggle with the lady fingers and then sugar in this type of dessert.
I did some searching and came up with a coconut flour "ladyfinger". Traditionally there was a spongecake used in place of the lady fingers.

Vanilla Sponge Ladyfingers - Gluten free, Grain Free, Sugar Free

In a mixer beat on high until very stiff:
5 egg whites
1 t cream of tartar
1 T agave nectar


In a seperate bowl in mixer beat on high untill thick and creamy:
5 egg yolks
1 t vanilla extract
3 T agave nectar


Sift together and set aside:
1/2 C coconut flour
1/2 t baking soda
3 T arrowroot


Fold the egg yolk cream into the stiff egg whites very gently. Slowly sift in the flour mixture delicately bunches at a time folding continuously avoiding any clumping together.
Once blended completely and smooth, preheat oven and prepare pan.


Place parchment paper in a cookie sheet. Use a cookie cutter or a glass goblet (the one you will use for your serving dish so the biscuit will fit inside) and trace with a non toxic pencil 8 circle patterns.


Using a spoon spread the batter evenly among the circles staying inside the lines.
Bake at 350 degrees for 9 minutes.
Let cool completely.

I placed the batter into the circles in order to make them fit in the goblet. If you are making this in a flat pan then you could make long strips or squares to fit in your pan. You could also leave it as one large piece but it will be more difficult to soak.

Once the lady fingers are cooled completely start to soak them. Make 1/3 C strong coffee or espresso and let cool. Add 3 T Kahlua or amaretto or brandy and stir.
Set ladyfingers in the coffee mixture and flip over every few minutes.


Tiramisu - Gluten Free, Grain Free, Sugar Free

Beat together in a mixing bowl:
1 Cup whipping cream
3 T agave nectar
1 t vanilla

1 t Kahlua

Beat together in a mixing bowl:
1 C Mascarpone cheese
1 t Kahlua

Beat together in a mixing bowl:
1 C Creme Fraiche or just use 2 C Mascarpone total
1 t Kahlua

Fold the Creme Fraiche and the Mascarpone mixture one at a time into the whipped cream very delicately. Taste. If it's not quite sweet enough add some stevia.

Take one soaked ladyfinger. Place it in the bottom of your goblet Scoop 1 inch of custard over the lady finger. Dust with unsweetened cocoa powder. Drop another lady finger, scoop 1 inch of custard over the lady finger and dust with unsweetened cocoa powder. Cut some dark chocolate curls and top.

Place in the refrigerator overnight or in the refrigerator for 2-4 hours until set and well chilled.
This of course can be made in a flat 9x13 pan. I didnt have a gorgeous triffle pan to delicatley layer and place on my counter top to admire. I had these lovely goblets from my bridal shower that I thought would be perfect. They turned out well.


I had just enough tiramisu left over to try it and it's quite lovely silky and light. It's between a mousse and a cheesecake. All that is missing I just need a leaf of green mint now to make them pretty. lol.

Thursday, April 12, 2012

Buckwheat Crepes- grain free, gluten free, sugar free, dairy free

One of my favorite things is food. Not just because it tastes good and is social but because of the fun I have cooking and baking and watching other people eat my food and not even notice the difference between glutenous sugar food and gluten free sugar free food.
Over easter I made some of my favorite recipes. I served my buckwheat crepes for breakfast with sugar free freezer jam, organic berries and creme freche.
I was in charge of the birthday cake for over Easter at a family dinner with the in laws. I brought my grain free vanilla bean cake (tweaked for Paleo suitable) with bumble berry sugar free filling, sugar free, dairy free butter cream frosting (colored with beet juice) I topped the cake with sliced strawberries and sliced almonds.
It was a gorgeous light pink color with pretty strawberries. 
Sugar free icing that tastes good and is not nut based or sugar based is tricky. I struggled with the icing. It took about 3 tries to get it right. The third try had to work i had run out of butter and sucralose. Then my 3rd try was delicious, fluffy, set up nice and then it froze in the fridge over night and separated just before I had to frost my cake. GRRRR.. but no one noticed and all i got was great reviews. 
It was a fantastic cake! all around the room everyone loved it including those glutenous lovers. 
It was a very difficult task to make a cake that everyone would like and would suit different diets. My parents, Kyle and I are gluten free. Mallory is Paleo as strict as possible. My aunt is a diabetic, and the rest of the people had no requests. So it was important I could show that everyone even the un expecting can enjoy and love GRAIN FREE.
So I proved to myself that I am not the only person who thinks my food is good. Sometimes I worry, the longer you go without sugar and mono-sodiumglutamate, and wheat is your tastes change. 
We have been getting our groceries delivered lately (I know, I know). It's not like I do not have enough free time to go shopping. It's more like it takes me ALL day to buy groceries. twice a month. Not just because I Have to drive to Calgary, but because I have to go to 5 different stores just to get everything.

Bulk Barn - for all of my baking and cooking ingredients
Community Natural Foods - for all organic and natural items
Gluten Free Marketplace - for all things gluten free
Walmart Super Center - groceries
Pure Country - Meat

So when we were introduced to SPUD I was skeptical thinking, "Oh god another store". I was THRILLED. EVERY thing they offer is organic first off, second they have gluten free variations of most everything, and third they will deliver every week. 
I now only go to Bulk Barn every 6-8 weeks when I run out of something. I have completely eliminated Community and hardly ever have to go to the Gluten Free Marketplace.
I get so excited about my delivery every week I look out the window all day in anticipation. lol. So enough said I will brag about SPUD next week! I will now have so many new recipes weekly to show you as I am now able to eat so many things that I thought I would never eat again. !!!!!!!!

My buckwheat crepes were a HUGE hit. I had them for the first time in a breakfast lounge. My friend and I meet for lunch dates often and she introduced me to this restaurant. I had never even heard of buckwheat in anything other than gluten free flour mixes (which I do not use) so I was skeptical. 
They were delicious! tasted just like the crepes I remember making in Home Economics. Except they didn't leave me with a stuffed, bloated, full, gut ache feeling such as wheat. I of course told Kyle about this fabulous restaurant and we planned a lunch date there. He loved them, thought they were delicious so out we went to go buy a crepe pan. 
I will say that I was afraid of making them the first time because there is so many ways to mess them up. My first try was so successful we ate crepes for breakfast, dinner and breakfast the next day lol.

So here is my fantastic recipe and terrible photos to guide you through my grain free crepes.

One of the most important things about crepes is the batter consistency, the heat of the pan, and the flipping.

You will learn quickly as you make crepes where you failed by what happens. If your batter consistency is not right your crepes will crack and break when you fold them. If your crepe sticks to the pan your heat wasn't high enough.
No worries though if your crepe fails you can adjust the heat or the batter and save the rest of them from the same bitter fate.
Make sure you have everything ready and out before you start. Crepes are cooked one at a time, but are very special. They need one on one attention and it's hard to do that when your running around looking for a SPATULA. They go from perfect to crispy in a few seconds. Burnt ones just taste gross and won't hold their shape. I use organic, non hydrogenated Grapeseed oil in a oil mister bottle to coat the pan on the first crepe and then only when needed there after. I recommend using a neutral oil such as grape seed or butter not olive oil.
Use a silicon spatula as it will bend underneath the crepes without breaking them and is recommended on a crepe pan.
I also have the toaster oven heated on low before I start the first crepe to keep them warm while I cook them. It will be about 30 min from when you start the first crepe until you are done.


1. Batter Consistency
Beat the ingredients well and make sure there is absolutely no lumps in the batter. You can always sift the flour to be sure or whip the eggs as you add the flour. It's very important that you check the consistency BEFORE you add the water, AFTER you add the water and BEFORE you pour them into the pan after they have sat for a few minutes.

Thick crepe batter is just a pancake. Thin batter is just an omelet. 

If your batter is too thick add more water. If the batter is too thin and not stringy add more flour, if it's too watery add more eggs. It will be different depending on climate change in order to get the batter just perfect. So if today you need to add more water then yesterday no sweat!


Look at the picture closely. As you pull your whisk away you should see strings just like the photo. It should hold together but not be thick like a pancake and not watery like an omelet. If you don;t have this consistency you will not end up with a crepe. Just the right combination of eggs to flour will give you this consistency.

2. Heat

It's very important you have the pan on the right heat. Do not cheap out on your crepe pan please. It should be heavy bottomed and perfectly flat and balanced. Turn your heat onto med high for 3-4 minutes. The pan should be hot when your hand is placed above the pan and evenly heated. Once your heat is reached turn the heat down to medium and continually adjust the heat to maintain the same temperature. 
Your crepe batter will set in about 5 seconds once hitting the pan. That is how you know if its hot enough. Not hot enough and your crepes will stick. 


Once your batter is ready and the pan is hot pour in the batter with one hand and rotate the pan at the same time. It sounds harder than it is. You can also pour in a little batter, quickly rotate and then pour in more batter and quickly rotate until the entire bottom is evenly coated and no holes.


 If you end up with a hole pour in more batter quick. You have about 5 seconds to fix any mistakes and then the bottom will be set and it's too late. But no worries crepes with holes are just as delicious. 

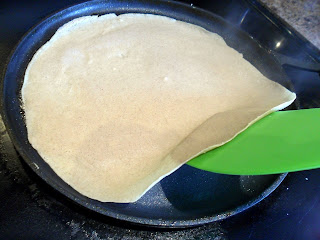
Once the bottom is evenly coated watch the batter closely. It will firm up, change color and steam. The edges of the crepe will start to pull away from the pan. It takes a whole 30 seconds tops. 
If your unsure if it's ready slip the edge of the spatula underneath the sides. It should completely lift off the pan without sticking anywhere if it's ready.
Now you are ready to FLIP!


3. Flipping

When it comes to flipping it will depend on your pan, if your heat was high enough and your skills. When your crepe is ready place a large plate on the counter and flip the pan over directly above the plate. The crepe should fall right off the pan in one piece onto the plate. Quickly put the pan back onto the heat and slide the crepe back into the pan cooked side up.


It will only need to cook 7-10 seconds on the flip side just until its firm and once again slides out of the pan on it's own. 

Let the crepe sit for about a minute flipping over on the plate as it cools briefly to release the excess moisture. Place it flat into a heated oven to keep warm on low so the crepe doesn't dry out.


There you have it! a perfectly cooked crepe. It will be slightly golden, firm but not crispy. Top it off with some delicious compote or fresh fruit, whipped cream and ganache.


Buckwheat Crepes - Gluten free, Grain free, Dairy Free, Sugar Free

Makes 6-8

5 large eggs 
1/2 C plus 2 T of Organic Gluten Free Buckwheat flour
1 T organic raw agave nectar
1/8 t sea salt
1 t real vanilla extract

1/2 C filtered water

Beat the eggs until frothy and sift in the flour slowly until well combined. Add agave, sea salt, and vanilla. 
Mix the batter well until it's completely smooth. Whisk in water. Check batter consistency. 
Meanwhile heat up the pan and grease with grapeseed oil. Prepare the oven to keep crepes warm. Once pan is hot check batter consistency and pour into the pan. Rotate the pan imediately until a smooth thin layer coats the pan. cook for 20-30 seconds until just set. 
Flip the crepe over and cooked flip side for 7- 10 seconds. 

Check batter consistency. Start next crepe. 

Let me know how they turn out. I am excited to share this recipe with you. yum.