I have some UBER exciting news!!!! A friend of mine is featuring a recipe of mine directly on her site! I am so excited to share it with you, as I worked hard to come up with the recipe just for them.
Get the recipe for Grain Free French Bread "Baguette" here!!
And, of course, if you ever want me to write a recipe for you.. Ya know where to find me;)
My trip towards my new Grain Free Lifestyle. I was completely blown away and convinced after reading "Wheat Belly". My husband, and my parents are now following the new lifestyle changes. Follow me and see that life is still fabulously delicious after living without.
Thursday, January 10, 2013
Friday, January 4, 2013
Banana "Cream" Pudding - Gluten Free, Grain Free, Sugar Free
Yes it's me! I did survive the Holidays!
I had originally planned to add some great holiday recipes to the list, but then I got distracted, got behind with orders, got behind in making gifts, got behind in making baking, and just really got behind.. sigh.
So I decided to save myself the stress and not worry about it. It also greatly helped me to chuck the delicious food in the freezer to save me from myself and indulging.
SOOOO.. here I was today, wanting something new, fresh, chilled and easy. I ran through a bunch of my favorite books and got some ideas and then I landed upon a page dear to my heart. Banana Cream Pie, oh how I love thee:)
Well, I didn't feel like making a crust, or going fancy with the gelatin and so I thought how delicious would it be to have the scrumptious banana cream all on it's own?
I discovered that it's called Banana Pudding on Google lol. But I didn't want to use starch or flour.
The traditional Banana Cream Pie (before the days of processed Cool Whip and JELLO Instant Pudding Powder), Was a classic custard made with flour egg yolks and sugar. You of course can find a ton of Gluten Free Banana Cream filling recipes. You can also find Primal ones with almond butter that bake into a gooey center.
I just picked a couple different recipes out of my books (as I usually do) and I figured that I would either end up with a pudding or a cold soup. Either way, I would eat it and learn.
This delicious pudding is made from bananas with only a splash of agave to help thicken and Coconut Butter as the primary thickening agent. I did use egg yolks, but unless you use a lot more of them and stir in the classic half a cup of flour, it's hard to get a thick pudding.
I used three bananas for the filling that were prviously frozen, that I just thawed and mashed. You will get a great result using fresh bananas as long as they are black and ripe. If not I would suggest using a sweetener to taste. I loved the rustic texture of my hand stirred pudding, if you want it to be whipped and smooth, throw it in a food processor before refrigerating. You can use this pudding as a banana cream pie filling. Pre bake your crust or use a no bake (such as in my cheesecake recipe) and chill the pudding. Once chilled, place in the pie shell and freeze. Just top with Coconut Whip cream and slice.
I found this pudding to be stupid good, like soo good on my way down the stairs to go order more bananas I had to refill my bowl. It's like a banana cream pie without the pie or a banana bread without the bread, or a banana pancake without the pancake. Pile on those walnuts and chow down on this delicious chilly goodness.
You could make it fancy and throw in some chocolate chips!
MMMMMmmmmmm.
Banana Cream Pudding - Gluten Free, Grain free, Sugar Free
This is for my mom who tried to make banana cream pie with an avocado :)
Topping:
Place in a small glass bowl:
1 sliced banana
2 t lime juice
Place in refrigerator.
Pudding:
In a saucepan over medium heat:
1.5 C Organic milk, cashew milk or coconut milk
2 organic egg yolks
2 t real vanilla extract
pinch of sea salt
Stir constantly until bubbly and starting to thicken.
Pour in 3 T warm and soft coconut butter**
Whisk continuously until pudding is thick and no coconut butter remains. Pour into a glass bowl on the side.
In the same sauce pan over medium heat:
3 mashed bananas
3 dashes of cinnamon
2 T butter or coconut oil
splash of real vanilla extract
Stir and cook for 3-4 minutes until banana is browned and heated through. Add the bananas to the custard and mix well together. For a smooth texture puree in a processor. For a chunky texture mix by hand.
Cover with plastic wrap. Place the plastic wrap all the way down into the bowl so it covers and sits on top of the top of the pudding. This will prevent a skin from forming.
Chill in the refrigerator for an hour or more until gelatinous.
Scoop into a bowl and place three chilled sliced bananas with lime juice on top, and sprinkle with chopped raw walnuts.
Though the coconut butter was used I didn't taste in in the recipe so don't be afraid.
Delicious!!!!
** The coconut butter is used to thicken the pudding. If you don't have coconut butter, you could use cashew or almond butter. Using a nut butter though may change the taste and make it nutty. Otherwise you can sub in coconut flour or corn starch by the teaspoon until it's thick to your satisfaction. **
Using coconut butter to thicken is a great way without using starch or flour. It can be deceiving though as it will not start to show exactly how thick it is until the pudding cools. You will see an immediate thicken but it will become a pudding texture until after chilling versus a soup texture while it's hot.
If you use too much coconut butter you may end up with an ice cream texture you could eat frozen. yum!
I had originally planned to add some great holiday recipes to the list, but then I got distracted, got behind with orders, got behind in making gifts, got behind in making baking, and just really got behind.. sigh.
So I decided to save myself the stress and not worry about it. It also greatly helped me to chuck the delicious food in the freezer to save me from myself and indulging.
SOOOO.. here I was today, wanting something new, fresh, chilled and easy. I ran through a bunch of my favorite books and got some ideas and then I landed upon a page dear to my heart. Banana Cream Pie, oh how I love thee:)
Well, I didn't feel like making a crust, or going fancy with the gelatin and so I thought how delicious would it be to have the scrumptious banana cream all on it's own?
I discovered that it's called Banana Pudding on Google lol. But I didn't want to use starch or flour.
The traditional Banana Cream Pie (before the days of processed Cool Whip and JELLO Instant Pudding Powder), Was a classic custard made with flour egg yolks and sugar. You of course can find a ton of Gluten Free Banana Cream filling recipes. You can also find Primal ones with almond butter that bake into a gooey center.
I just picked a couple different recipes out of my books (as I usually do) and I figured that I would either end up with a pudding or a cold soup. Either way, I would eat it and learn.
This delicious pudding is made from bananas with only a splash of agave to help thicken and Coconut Butter as the primary thickening agent. I did use egg yolks, but unless you use a lot more of them and stir in the classic half a cup of flour, it's hard to get a thick pudding.
I used three bananas for the filling that were prviously frozen, that I just thawed and mashed. You will get a great result using fresh bananas as long as they are black and ripe. If not I would suggest using a sweetener to taste. I loved the rustic texture of my hand stirred pudding, if you want it to be whipped and smooth, throw it in a food processor before refrigerating. You can use this pudding as a banana cream pie filling. Pre bake your crust or use a no bake (such as in my cheesecake recipe) and chill the pudding. Once chilled, place in the pie shell and freeze. Just top with Coconut Whip cream and slice.
I found this pudding to be stupid good, like soo good on my way down the stairs to go order more bananas I had to refill my bowl. It's like a banana cream pie without the pie or a banana bread without the bread, or a banana pancake without the pancake. Pile on those walnuts and chow down on this delicious chilly goodness.
You could make it fancy and throw in some chocolate chips!
MMMMMmmmmmm.
Banana Cream Pudding - Gluten Free, Grain free, Sugar Free
This is for my mom who tried to make banana cream pie with an avocado :)
Topping:
Place in a small glass bowl:
1 sliced banana
2 t lime juice
Place in refrigerator.
Pudding:
In a saucepan over medium heat:
1.5 C Organic milk, cashew milk or coconut milk
2 organic egg yolks
2 t real vanilla extract
pinch of sea salt
Stir constantly until bubbly and starting to thicken.
Pour in 3 T warm and soft coconut butter**
Whisk continuously until pudding is thick and no coconut butter remains. Pour into a glass bowl on the side.
In the same sauce pan over medium heat:
3 mashed bananas
3 dashes of cinnamon
2 T butter or coconut oil
splash of real vanilla extract
Stir and cook for 3-4 minutes until banana is browned and heated through. Add the bananas to the custard and mix well together. For a smooth texture puree in a processor. For a chunky texture mix by hand.
Cover with plastic wrap. Place the plastic wrap all the way down into the bowl so it covers and sits on top of the top of the pudding. This will prevent a skin from forming.
Chill in the refrigerator for an hour or more until gelatinous.
Scoop into a bowl and place three chilled sliced bananas with lime juice on top, and sprinkle with chopped raw walnuts.
Though the coconut butter was used I didn't taste in in the recipe so don't be afraid.
Delicious!!!!
** The coconut butter is used to thicken the pudding. If you don't have coconut butter, you could use cashew or almond butter. Using a nut butter though may change the taste and make it nutty. Otherwise you can sub in coconut flour or corn starch by the teaspoon until it's thick to your satisfaction. **
Using coconut butter to thicken is a great way without using starch or flour. It can be deceiving though as it will not start to show exactly how thick it is until the pudding cools. You will see an immediate thicken but it will become a pudding texture until after chilling versus a soup texture while it's hot.
If you use too much coconut butter you may end up with an ice cream texture you could eat frozen. yum!
Monday, November 5, 2012
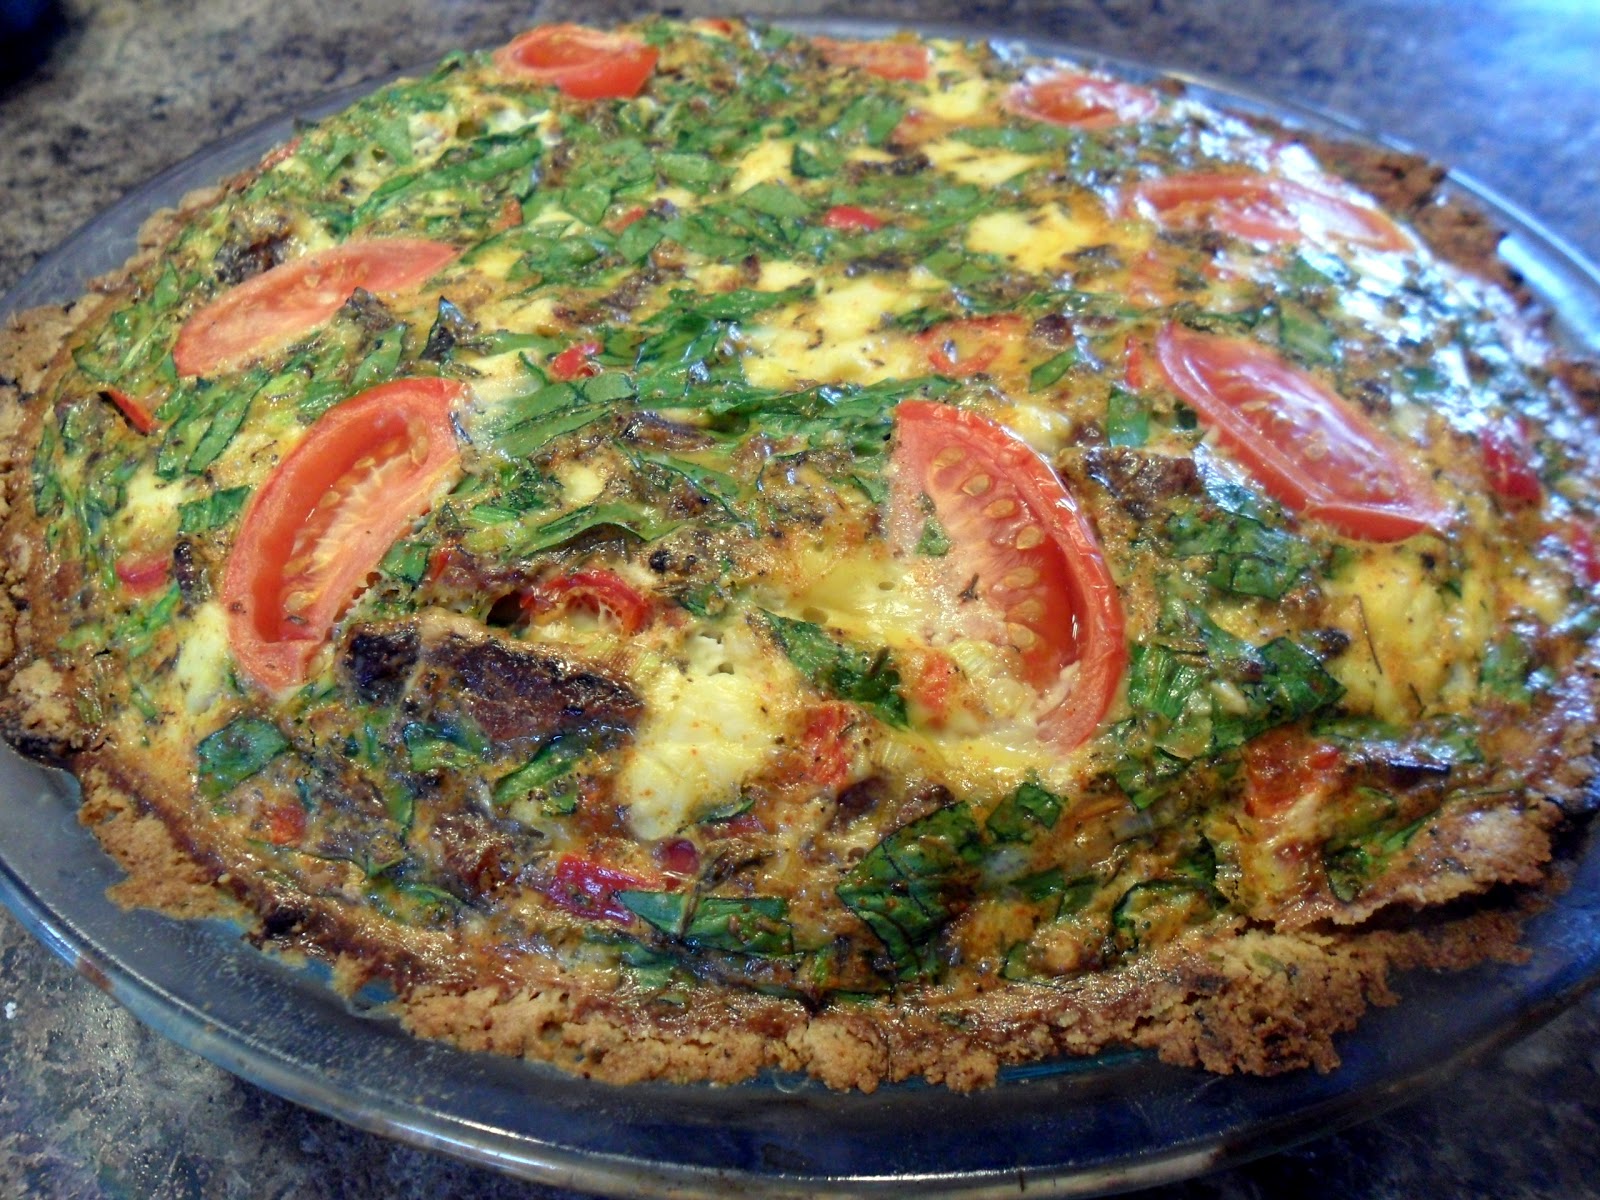
Savory Quiche - Grain free, Gluten Free
On the weekend, I am always in the mood for something a little more extravagant then a fried egg and a glass of milk.
However, Kyle always wants eggs, and bacon :) Usually I will stick to waffles or pancakes (using both my whey powder recipes). However on Sunday, I wasn't in the mood for carbs.
I woke up a bit early so I had some extra time. I was having some fond memories of a hot warm quiche coming out of the oven as I sipped on my coffee and watched the snow pile up on the windows. Mmmm quiche. You know those little mini tarts that are served at parties? Besides those parties and Home Economics, I never really made them.
I was excited to try something new without adding a full carb load onto my day.
I wasn't sure exactly what crust I was wanting to try. traditionally a wheat pie crust would be used, or a store bought frozen tart shell.
I was thinking about how I didn't really feel like making my FABULOUS pie crust this early am. So I went with a herb almond flour crust.
This crust was very flavorful and delicious. The only downfall I could say is it doesn't hold together as well hot fresh out of the oven versus when it's cooled down or eaten cold.
You can cut it and it holds together, don't get me wrong, but it does crumble.
I think this recipe turned out delicious, but it did take longer then the average breakfast. To pick up the pace I would recommend making the crust the night before and refrigerate. Then simply mix up your quiche, pour it in and bake. If you want you could switch out this crust for my pie crust or you can simply let the quiche cool for 15-20 min or eat cold with a salad at lunch time.
The best part about a quiche is you can really use up a bunch of vegetable that are just hanging out in your fridge. I used our last garden tomato on the top of this one!
For the most part, the vegetables will float so you can be creative with the colors of what you throw in.
When I was making the crust I was really just throwing in a bunch of deliciousness into a bowl and tossing it together. I have made this twice now. Same crust different veggies. Perfect every time.
The crust is a press in. You will need to use your hands and press it in. It's your choice if you want to go up the side of the pie plate or not. You can do a thicker crust just on the bottom or a thin one up the sides as well.
I love the crispy savory texture of the crust so I always put it up the sides so every bite is delicious. Feel free to use any other spices or herbs you deem fit in the same ratio. You can also double the recipe for a lasagna pan size casserole, versus a quiche. This fed us most of the week for breakfast. Just fry a crisp piece of bacon and served the quiche hot from the toaster oven with coffee.
Savory Herb Quiche - Grain free, Gluten free
For the Crust:
In a small saute pan:
Brown 1/2 C diced red onion with 1T butter until tender and soft. Set aside.
In a small mixing bowl:
1 1/2 C blanched almond flour
2 T chopped fresh Parsley
1 T dried italian herbs or 2tsp each dried oregano and basil
1/4 t Herbamere, sesame sea salt blend, sea salt, or kelp seasoning
1/4 t garlic powder
1/4 t onion powder
dash smoked paprika
Stir together. Add in the sauteed onions.
Melt 1/3 C coconut oil, or butter and pour into mixing bowl. Toss ingredients together until wet and crumbly. Scoop the crust into a greased pie plate and press with hands on the bottom and up the sides. Approx. 1/4 inch thick.
Place in the refrigerator until firm. 10-15 min.
For the Quiche:
In a large mixing bowl:
1/2 C diced baby spinach or brocolli
1/4 C chopped red pepper or mushrooms
4 pc bacon cooked and crumbled or 1/4 C diced ham
1/4 C cream cheese, goat cheese, or grated cheese of choice
1/4 C heavy cream, half and half, or coconut milk
5 lrg Organic eggs
1 T thyme
Dash cayenne pepper
1/4 t smoked paprika
1/4 t garlic powder
1/4 t black pepper
1/8 t Herbamere, or sea salt
Mix very well until combined. Pour into the firm and cool crust. On the top place
1 tomato cut into 8 wedges.
Bake in the oven at 400 for 35-40 minutes. Quiche will puff up in the oven and fall once removed. Quiche is cooked when the center is firm and not wiggly.
However, Kyle always wants eggs, and bacon :) Usually I will stick to waffles or pancakes (using both my whey powder recipes). However on Sunday, I wasn't in the mood for carbs.
I woke up a bit early so I had some extra time. I was having some fond memories of a hot warm quiche coming out of the oven as I sipped on my coffee and watched the snow pile up on the windows. Mmmm quiche. You know those little mini tarts that are served at parties? Besides those parties and Home Economics, I never really made them.
I was excited to try something new without adding a full carb load onto my day.
I wasn't sure exactly what crust I was wanting to try. traditionally a wheat pie crust would be used, or a store bought frozen tart shell.
I was thinking about how I didn't really feel like making my FABULOUS pie crust this early am. So I went with a herb almond flour crust.
This crust was very flavorful and delicious. The only downfall I could say is it doesn't hold together as well hot fresh out of the oven versus when it's cooled down or eaten cold.
You can cut it and it holds together, don't get me wrong, but it does crumble.
I think this recipe turned out delicious, but it did take longer then the average breakfast. To pick up the pace I would recommend making the crust the night before and refrigerate. Then simply mix up your quiche, pour it in and bake. If you want you could switch out this crust for my pie crust or you can simply let the quiche cool for 15-20 min or eat cold with a salad at lunch time.
The best part about a quiche is you can really use up a bunch of vegetable that are just hanging out in your fridge. I used our last garden tomato on the top of this one!
For the most part, the vegetables will float so you can be creative with the colors of what you throw in.
When I was making the crust I was really just throwing in a bunch of deliciousness into a bowl and tossing it together. I have made this twice now. Same crust different veggies. Perfect every time.
The crust is a press in. You will need to use your hands and press it in. It's your choice if you want to go up the side of the pie plate or not. You can do a thicker crust just on the bottom or a thin one up the sides as well.
I love the crispy savory texture of the crust so I always put it up the sides so every bite is delicious. Feel free to use any other spices or herbs you deem fit in the same ratio. You can also double the recipe for a lasagna pan size casserole, versus a quiche. This fed us most of the week for breakfast. Just fry a crisp piece of bacon and served the quiche hot from the toaster oven with coffee.
Savory Herb Quiche - Grain free, Gluten free
For the Crust:
In a small saute pan:
Brown 1/2 C diced red onion with 1T butter until tender and soft. Set aside.
In a small mixing bowl:
1 1/2 C blanched almond flour
2 T chopped fresh Parsley
1 T dried italian herbs or 2tsp each dried oregano and basil
1/4 t Herbamere, sesame sea salt blend, sea salt, or kelp seasoning
1/4 t garlic powder
1/4 t onion powder
dash smoked paprika
Stir together. Add in the sauteed onions.
Melt 1/3 C coconut oil, or butter and pour into mixing bowl. Toss ingredients together until wet and crumbly. Scoop the crust into a greased pie plate and press with hands on the bottom and up the sides. Approx. 1/4 inch thick.
Place in the refrigerator until firm. 10-15 min.
For the Quiche:
In a large mixing bowl:
1/2 C diced baby spinach or brocolli
1/4 C chopped red pepper or mushrooms
4 pc bacon cooked and crumbled or 1/4 C diced ham
1/4 C cream cheese, goat cheese, or grated cheese of choice
1/4 C heavy cream, half and half, or coconut milk
5 lrg Organic eggs
1 T thyme
Dash cayenne pepper
1/4 t smoked paprika
1/4 t garlic powder
1/4 t black pepper
1/8 t Herbamere, or sea salt
Mix very well until combined. Pour into the firm and cool crust. On the top place
1 tomato cut into 8 wedges.
Bake in the oven at 400 for 35-40 minutes. Quiche will puff up in the oven and fall once removed. Quiche is cooked when the center is firm and not wiggly.
Sunday, October 21, 2012
Biscuits - Grain free, Gluten free
It has been a Loong summer over here. Hectic, busy and lots of vacationing..
So sorry for the delay! Just because I have been away doesn't mean that I haven't been cooking.
Today it's snowy, cold and winter is blowing in. I felt like soup. Vegetable soup and what goes good with vegetable soup?
BISCUITS!
I can tell you it has taken me months to find biscuit that I like.
I follow a lot of blogs, but none of them make a biscuit I am excited about.
Coconut flour makes very dense biscuits, like think cake donut. Solid and heavy.
I know without Gluten you cannot really acheive the same idea as glutenous baking powder biscuits, but you can still make them light.
NOW to make them Grain Free is a totally different subject. You can make delicious ones with Oat or rice flour but then the carb load is just outrageous.
A falling asleep carb load is not what I had in mind.
So here is a delicious biscuit, light, cracky, moist, soft, hold together well and delicious savory with ham and cheese, or with honey and tea.
You can definitely serve these with guests over that eat wheat and they would like them. What's the secret to a soft puffy biscuit that is grain free? Whey powder.
My favorite ingredient of course! Adding whey powder to these not only has the nutritional benefit but it helps them rise and be not as dense.
Baking Powder Biscuits - Grain Free, Gluten free
Makes 8.
In a glass bowl:
2 C blanched almond flour
1 t aluminum free baking soda
1 t sea salt
2 T unsweetened whey powder
In a small bowl:
1/4 C melted butter, grape seed oil, or lard**
2 small eggs or 1 lrg egg
1/4 t sucralose, stevia or other sweetener
Mix the wet ingredients into the dry. Form into 8 equal size biscuits and place on a parchment paper lined baking sheet. Biscuits will rise and puff up.
Bake at 350 for 8 minutes for soft and tender or 10-12 minutes for crunchy and firm.
Bottom should be just slightly golden brown. Allow to cool for 3-5 minutes before cutting, if they are too hot they will fall apart as you cut them.
Make these savory and throw in some rosemary, dry mustard, dill, cheese, ham, chives, garlic etc.
**substituting coconut oil for the butter will give them a coconut taste.
Store in a parchment or brown paper bag on the counter or refrigerate if desired. Storing in a Ziploc or plastic will make them very soft and they will mold fast.
So sorry for the delay! Just because I have been away doesn't mean that I haven't been cooking.
Today it's snowy, cold and winter is blowing in. I felt like soup. Vegetable soup and what goes good with vegetable soup?
BISCUITS!
I can tell you it has taken me months to find biscuit that I like.
I follow a lot of blogs, but none of them make a biscuit I am excited about.
Coconut flour makes very dense biscuits, like think cake donut. Solid and heavy.
I know without Gluten you cannot really acheive the same idea as glutenous baking powder biscuits, but you can still make them light.
NOW to make them Grain Free is a totally different subject. You can make delicious ones with Oat or rice flour but then the carb load is just outrageous.
A falling asleep carb load is not what I had in mind.
So here is a delicious biscuit, light, cracky, moist, soft, hold together well and delicious savory with ham and cheese, or with honey and tea.
You can definitely serve these with guests over that eat wheat and they would like them. What's the secret to a soft puffy biscuit that is grain free? Whey powder.
My favorite ingredient of course! Adding whey powder to these not only has the nutritional benefit but it helps them rise and be not as dense.
Baking Powder Biscuits - Grain Free, Gluten free
Makes 8.
In a glass bowl:
2 C blanched almond flour
1 t aluminum free baking soda
1 t sea salt
2 T unsweetened whey powder
In a small bowl:
1/4 C melted butter, grape seed oil, or lard**
2 small eggs or 1 lrg egg
1/4 t sucralose, stevia or other sweetener
Mix the wet ingredients into the dry. Form into 8 equal size biscuits and place on a parchment paper lined baking sheet. Biscuits will rise and puff up.
Bake at 350 for 8 minutes for soft and tender or 10-12 minutes for crunchy and firm.
Bottom should be just slightly golden brown. Allow to cool for 3-5 minutes before cutting, if they are too hot they will fall apart as you cut them.
Make these savory and throw in some rosemary, dry mustard, dill, cheese, ham, chives, garlic etc.
**substituting coconut oil for the butter will give them a coconut taste.
Store in a parchment or brown paper bag on the counter or refrigerate if desired. Storing in a Ziploc or plastic will make them very soft and they will mold fast.
Sunday, August 5, 2012
Chocolate Chip cookies - flourless, grain free, dairy free, gluten free, sugar free
I was so excited today, I was planning on listing pancakes. However, I was really really really craving chocolate chip cookies.
I wanted to make some but I have a hard time making them healthy.
I've been doing some research on baking pavlova cakes and pie crusts. I thought it would be a delicious alternative to grains using a meringue pie crust.
I am planning on going crazy with making macaroons for Christmas this year. I will make them in every color! Why macaroons?
They look great, colorful and decorative. But mostly, because then I only have to make one big batch and I can divide them per household that we go visit. No more making 10 different kinds of cookies because of all the different dietary needs and different tastes.
While I was browsing, I thought, how delicious would it be to make a cookie that was macaroon based instead of from grains. A meringue cookie, without being a shatter hard meringue. A meringue cookie without being gummy and chewy and funny looking.. A meringue cookie tasting like a cookie, looking like a cookie, and being small enough to shove one in my mouth every time I walk by type of cookie.
They are chewy, melt in your mouth tender, and simple ingredient wise compared to my other recipes.
Honestly, I will probably never make any other kind of cookie again. They were sooooo good, and I don't feel guilty after eating them.
These are meringue cookies, or macaroons without the filling. You could fill them though, if you wanted. I could hardly stand waiting for them to cook though so I don't think I would fill them.
They may look like ordinary cookies in the picture, but they are different. You could put them out on the table and just wait for someone to sneak one. They wouldn't even notice they didn't use flour or grains.
You can make them as difficult (by piping them out fancy) or easy (spoon) as you like. They will taste the same.
They didn't spread, or rise. They didn't change shape or move, so put them in the same shape you want them to come out.
Chocolate Chip Macaroons -
primal, grain free, gluten free, sugar free, dairy free
A macaroon (/mækəˈruːn/mak-ə-ROON) is a type of light, baked confection, described as either small cakes or meringue-like cookies depending on their consistency.
In a stand mixer bowl, beat until stiff peaks form:
3 organic egg whites
1/4 t sea salt
pinch cream of tartar or lemon juice
In a separate bowl mix together:
powdered sweetener to equal 5 tbs sugar (sucralose, or stevia)
1/4 C almond flour
1 t vanilla powder**
dash cinnamon
Once egg whites are stiff, sprinkle in 1/3 of dry mix over top of the whites and fold in gently. About 3 folds. Continue until all mix is combined.
Add: 1/4 C semi sweet or unsweetened chocolate chips
Fold twice. On a large cookie sheet with parchment paper, drop delicately by the tablespoon. Swirl top and flatten to size of desired cookie (You can also pipe the cookies for more elegance).
Cookies don't rise or spread so little space is necessary.
Bake at 300 degrees for 40 minutes, or until slightly golden and crisp on the outside.
The cookies should be chewy and soft in the middle but slightly crispy on the outside. I probably waited 3 minutes before trying one and it was great warm. I will have to try one cold and notice the texture change.
For best results keep cookies cold to stop meringue from turning gummy.
* If you don;t have vanilla powder, you can use vanilla extract but adding it to the egg whites while mixing. Too much vanilla with break down the whites.
Friday, July 20, 2012
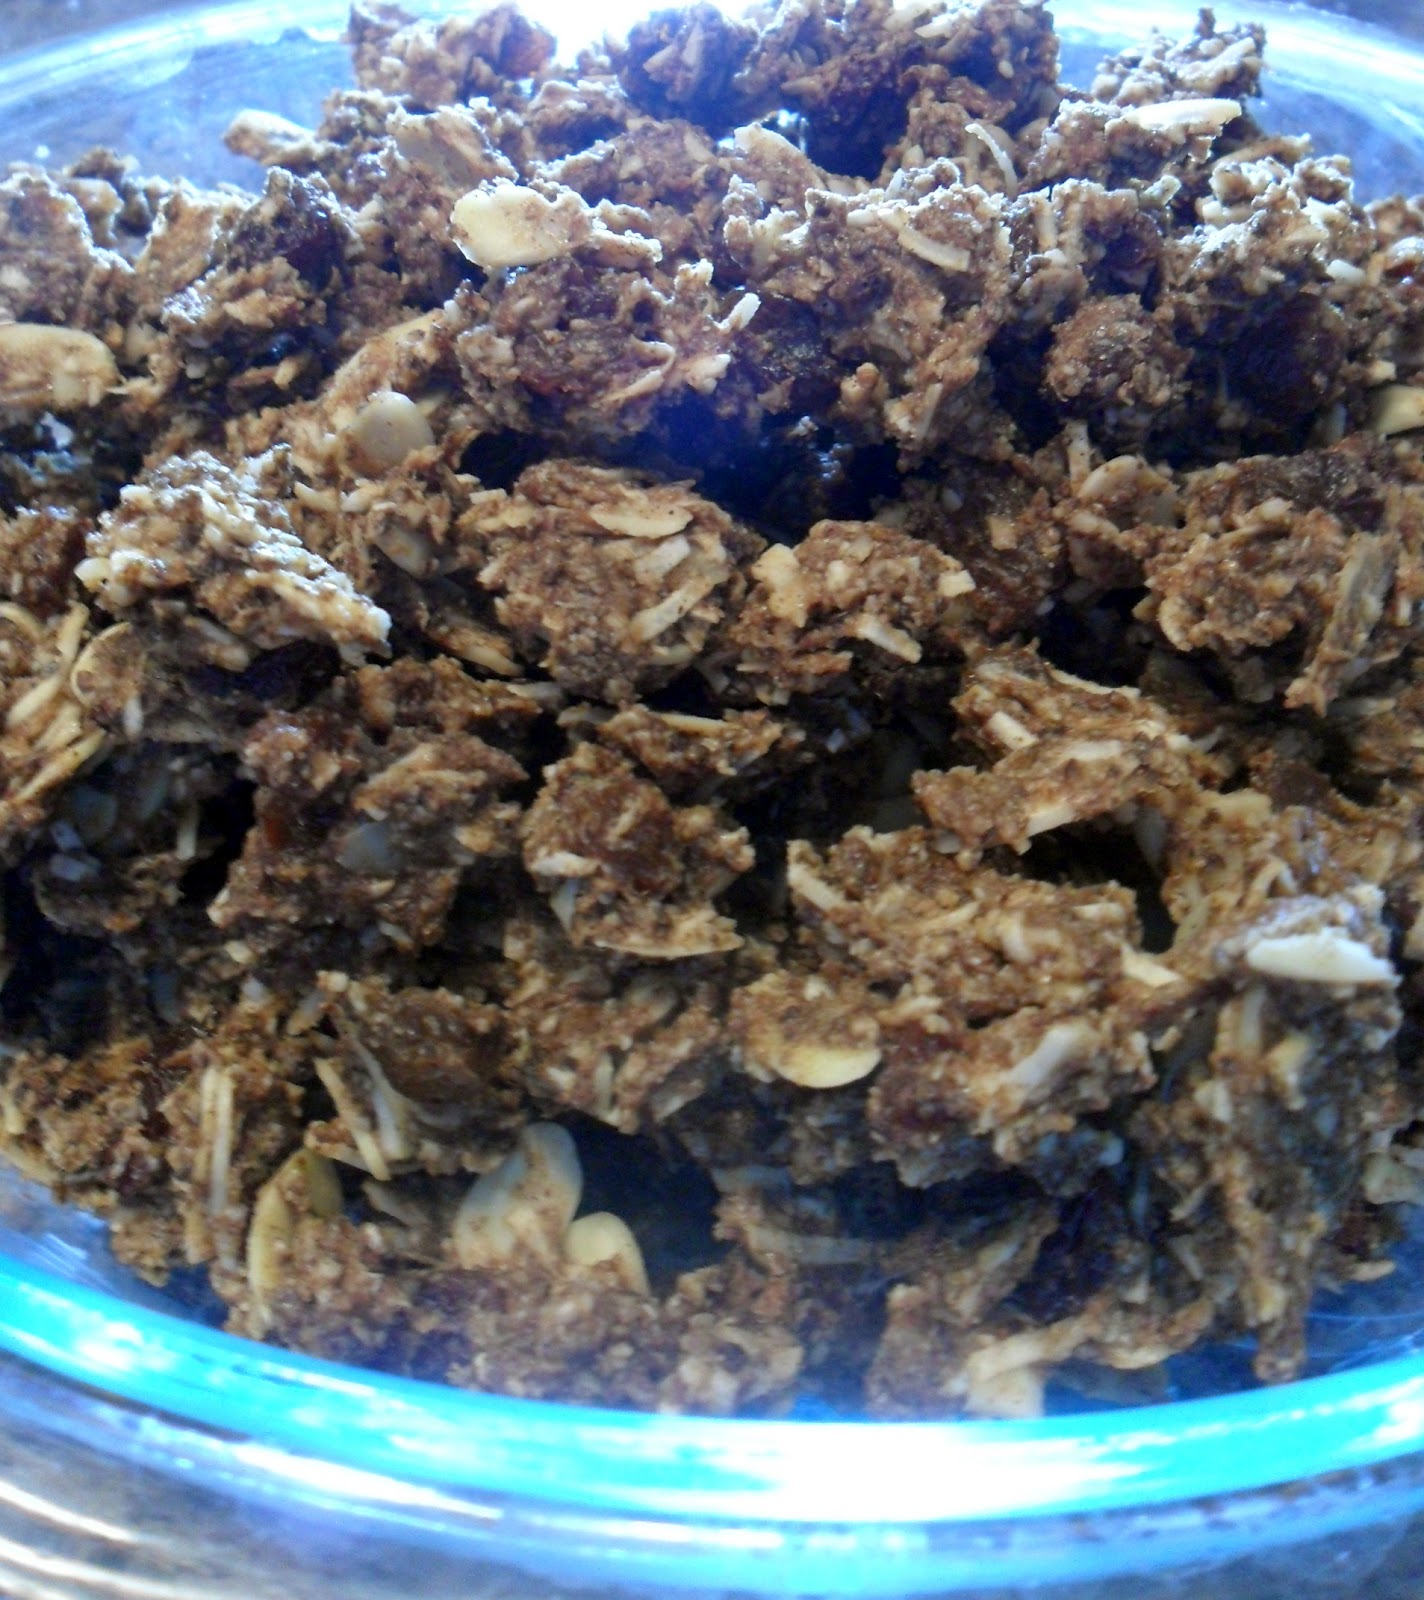
Grain Free Granola - sugar free
Ever since we got a dehydrator I have been thrilled with making my own granola. When we first started going grain free spending 9$ for a bag for only 1 weeks worth was tragic.
Originally I have always been an oatmeal eater, still to this day because it's so delicious; organic gluten free oats; I don't know how you can go wrong.
Sadly, I have been trying to slowly reduce my oats to weekly or biweekly, just because there are good reasons to do that and I like experimenting.
So I was thinking, a grain free granola? Hm, sounds good. Only I don't just want a mouth full of nuts. I like almonds, but almonds on top of almonds is a little too much for me.
You know my new favorite ingredient is Whey Powder. It's delicious, and has many different beneficial properties, besides being low in carb.
So I thought, how great would it be to use Whey powder as a base for the granola instead of rolled oats.
Here is what I cam up with:
Grain Free Granola - sugar free
Make this into, cinnamon raisin, strawberry vanilla, cranberry crunch, etc.
In a large mixing bowl:
4 C sliced blanched almonds*
2 C shredded coconut unsweet
1 C vanilla Whey powder unsweet
1 C organic raisins
1/2 C flax meal or 1/4 C chia
Stir together, In a seperate bowl mix:
1 C unsweetened apple sauce
2 T palm sugar, or equal to in splenda, stevia
1 T vanilla powder or real extract
2 T ground cinnamon
1 t sea salt
Combine the two bowls. Mixture should clump together but not be wet. Spread out on to several racks in dehydrator. Dehydrate at 200 degrees. Every 2 hours stir and crumble granola with your hands until mix starts to clump and dry together. Dehydrate 8 hours or so until crunchy.
Can be made in the oven baked at 200 degrees until crispy. Stir every 2 hours just the same.
Tuesday, July 17, 2012
Grain Free Bread - Dairy free, gluten free
I know, I know. It's been a LONG time since I have posted.
MY life just started getting busy, and busy, and busy, and it's time for some changes around here.
My business has been taking up all my free time, I am trying hard right now to actually increase my free time and pull away from my business slightly in order to have a life.
I have been cooking and baking just as mush as ever, but I haven't listed anything. I have lots of pictures stacked up. So I hope to have some great recipes to share with you.
I don't know what it is about today, but I felt like baking bread.
I am shocked actually to discover I should be eating more alternative grains then I am used to on a cleanse, so I have been making bread.
I know how some people just stay away from bread all together, but sometimes I am really at a loss for what to do with left over chicken, or ham and I would love just a quick sandwich.
I refuse to buy processed bread. Anything you can buy Gluten free, is full of horrible starches and more rice then I eat in a month. I can't force myself to eat them without feeling awful full allllll day and a total pile of guilt.
I have made some breads in the past.
Coconut flour, tapioca flour, almond flour, and I usually don't really care for them. I will say I don't like finding coconut flour in my bread.
I also don't like really dense cakey bread. But, of course you know it's near impossible to get a fluffy and light loaf without Gluten.
I went to my favorite organic, Natural food store and was very please with their big variety of nut butters. I have honestly never bought anything but almond or peanut. I thought, HEY, if I can make semi good bread from almond butter, what can I make from others?
I dunno if you have noticed but almond butter doesn't really have that much taste.
So what about other delicious organic butters? Raw cashew, tahini, sunbutter, pumpkin seed, hemp seed. There is just so many how can you choose?
Today I knew I was going to bake bread, so I looked in the pantry and had inspiration.
I wanted to see if it was possible to make a better tasting bread that was just as good for sandwiches, as it was to smother with goat cheese and olive oil and eat as a snack. I want it to be grain free, and delicious without a lot of starches.
Delicious and moist, fluffly with air bubbles, and a crispy crust. It's pretty much all I could ask for. Now if only I could get my bread maker to make it for me :)
When it comes to the grocery bill, this is not a cheap bread to make. Compared to the $9 loafs you can buy though they taste better and cost about the same.
I used a combination of raw and organic nut butters in this recipe with the desire of taste in mind. You can definitely use substitutes in place. The only butter I don;t recommend is coconut. It is by far different and I really don;t know what you would end up with. Changing the recipe could cause your bread to rise differently, bake faster, shorter and change color.
One thing I can note is using sunflower seeds will cause your bread to turn green. Not a very nice green either, but it is totally okay to eat. Using sunbutter you will want to decrease the baking soda in order to decrease the "green" doing so will make your bread more dense.
Grain Free Bread - Gluten free, Dairy free, Sugar free
Yields approx. 4-5 inch tall loaf
*Whey powder will give you a great rise, almost double in size without having to beat your egg whites. I recommend it*
In a stand mixer bowl:
3/4 C Raw Smooth Organic Cashew Butter
- Substitute, Tahini, Pumpkin Seed, Almond, or a combination
1/4 C Organic Sesame Tahini (sesame seed butter)
4 organic eggs
1 T organic apple cider vinegar
1 T sweetener (honey, agave, stevia, sucralose, palm sugar)
Beat well until very smooth. Scrape the bowl and add:
1/4 C unsweetened Whey Powder
- substitute almond flour, I prefer to use good for you Whey powder versus
beating egg whites. If using almond flour you may want to beat egg
whites separately and fold into ingredients.
2 T pumpkin seeds chopped
2 T chia seeds or hemp seeds
1/2 t sea salt
1 t aluminum free baking soda
1/4 c golden flax meal or arrowroot powder
Beat until smooth and thick.
Grease a medium size bread pan with coconut oil or "flour" with flaxmeal and use butter.
Spread batter into pan and smooth out the top. Bake at 350 degrees for 40-45 min.
**Using a big pan will cause a shorter loaf of bread. If using a big pan double the recipe.
**change out the salt for cinnamon and vanilla if sweet bread is desired**
If you use a different combination of nut butter that you like let me know. I have found this to be my favorite blend. Almond butter will cause a much darker loaf but very delicious.
Subscribe to:
Posts (Atom)